So I am currently undecided about a few things.
Do I keep the gas motor for lift or do I buy a ducted fan?
I will need to buy various things for the gas motor and it would require much more work for mounting. It is also messy as there is no muffler so it just spits unburned fuel and exhaust everywhere.
The ducted fan seems to be in the 20-50$ range for something pretty reasonable. The benefits of having the ducted fan is that I wouldn't require the bonnet. I could just glue the whole top section together and just have it mounted on rods to the lower section as it wouldn't require the ease of access into the air chamber as the gas motor would. Its the lowest and most forward component so that there may be the occasional slight spray hitting it or if it stops on the water it may sink sightly and the that component is destroyed.
How do I go about completing the top of the lower section?
I have a few options here, I'm not sure if its worth using foam as it is only about 5mm high in places and with the expansion It would just have too much excess. Fibreglass, I can fibreglass the whole float, this is messy and time consuming but it would provide a structurally sound piece and would be pretty light. Remote controll plane film, this is basically just a heat shrinking contact sheet, its light but it wouldn't add a whole lot to the structural integrity.
What does everyone think?
Cheers
Friday 8 July 2011
Monday 4 July 2011
Main Body, Float
Sorry for the absence, I have been to the coast for a camping trip.
 I finished cutting out all the balsa for the rest of the top structure and glued it all together. Then using the same taping method as the bonnet I taped it all up and filled it with the remaining foam. I started to trim it up but left it reasonably proud as it still needs a bit of foam. One more canister and all the foaming should be done. I am leaving this section for now so that I can make any adjustments so the pieces fit together before filling in the remaining foam.
Bunnings finally had some in stock so I purchased 5, 2.5mm pieces and 3, 5mm pieces to begin constructing the lower frame. $4.65 for a 5mm piece is much better than craft store prices. I also had to get more glue, I decided to try Selleys Liquid nails. I also bought some Selleys Plasti-Bond to try out.
When I got home I started cutting out parts for the buffet/float skeleton. I began with the area for the motor mount and then extended from there. This was mostly because it was the highest point and also needed to be very solid. I didn't worry about printing anything out for this as it was easier to just work out from the centre and then taper it to the required thickness. This only required the lengths of all the sections off the Catia model. I chose to leave the middle section open so that when I glued the 2.5mm sheets underneath this would allow for a bit of adjustment.

 I then started a separate section for the rear whilst waiting for glue on the front section to dry. When both sections were dry I joined them together, I still chuckle each time I can see a representation of the actual size and what I have taken on.
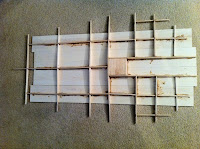
After this was all dry I began to stick the sheets of 2.5mm on the bottom. These sheets should give me something to mount the skirt to and the whole section should allow it to float and keep the electrics dry should it die on the water. I began by sticking the first two sheets in the middle and this allowed me to mark out where it needed to go so the front could be adjusted an the back would be down the centreline. Working out from the centre I would just glue a sheet on each side. I then added in small pieces to make the surround as be seen from the picture below.
Whilst waiting for the glue to dry (about 30 mins - 1 hour depending on room temp) I started making other smaller parts out of the balsa off cuts. I started making a tower for the drive motor so that I could learn how best to work with the Plasti-Bond.
Cheers
 I finished cutting out all the balsa for the rest of the top structure and glued it all together. Then using the same taping method as the bonnet I taped it all up and filled it with the remaining foam. I started to trim it up but left it reasonably proud as it still needs a bit of foam. One more canister and all the foaming should be done. I am leaving this section for now so that I can make any adjustments so the pieces fit together before filling in the remaining foam.
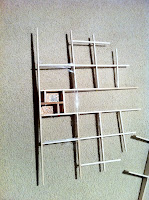 |
| Under side of the motor mount. |
 |
| The build so far. |
 I then started a separate section for the rear whilst waiting for glue on the front section to dry. When both sections were dry I joined them together, I still chuckle each time I can see a representation of the actual size and what I have taken on.
After this was all dry I began to stick the sheets of 2.5mm on the bottom. These sheets should give me something to mount the skirt to and the whole section should allow it to float and keep the electrics dry should it die on the water. I began by sticking the first two sheets in the middle and this allowed me to mark out where it needed to go so the front could be adjusted an the back would be down the centreline. Working out from the centre I would just glue a sheet on each side. I then added in small pieces to make the surround as be seen from the picture below.
 |
| Weighted down to dry. |
Whilst waiting for the glue to dry (about 30 mins - 1 hour depending on room temp) I started making other smaller parts out of the balsa off cuts. I started making a tower for the drive motor so that I could learn how best to work with the Plasti-Bond.
Cheers
Subscribe to:
Posts (Atom)